# What is Hakuna?
Hakuna is a product protection specialist. With our end-to-end technology platform and a strong network of insurance partners, we provide retailers and manufacturers with everything they need to develop their own multichannel product protection programs for their European retail businesses.
For more information about what we do, please visit our website:
{% embed url="" %}
# How it works
With Hakuna, you can flexibly create user journeys where your customers can purchase product protection for their products in any of your channels.
Generally, there are three checkout types:
* **Integrated checkout:** Enables customers to purchase product protection together with the protectable product in a single transaction
* **Self-service checkout with Hakuna Redirect:** Enables customers to purchase product protection in a separate, self-service transaction
* **Guided checkout with Hakuna Assist:** Enables sales and support staff to guide customers through the purchase of product protection during direct interactions
The type(s) of checkout(s) you should use depends on your use case(s). For example, if you want to sell product protection during the checkout flow of your online shop, you should probably use an integrated checkout, whereas for post-purchase email campaigns, a self-service checkout with Hakuna Redirect is likely the best fit.
Please refer to the linked guides for more information on the required steps for each checkout type:
{% content-ref url="/pages/QLUQcl2Ibm2UgLCaLiMp" %}
[Integrated checkout](/integration-guides/integrated-checkout)
{% endcontent-ref %}
{% content-ref url="/pages/gsLMuSDhFHf2HRHw0bkT" %}
[Self-service checkout with Hakuna Redirect](/integration-guides/self-service-checkout-with-hakuna-redirect)
{% endcontent-ref %}
{% content-ref url="/pages/KYndDeNDYUwnCmsk0EoX" %}
[Guided checkout with Hakuna Assist](/integration-guides/guided-checkout-with-hakuna-assist)
{% endcontent-ref %}
If you are unsure which checkouts are right for you, please reach out to your Hakuna Account Manager.
# Integrated checkout
With this solution, you can create customized, fully integrated user journeys where your customers can purchase product protection alongside protectable products in any of your channels.
You will need to:
* represent protection products in your system
* match them with the applicable protection products
* present the protection products to your customers
* manage the cart
* share any order events with us
We have [API Helpers](https://hakuna-api.redoc.ly/#tag/E-commerce-integration) available for matching, cart validation and tracking connections between protection and protectable products, but ultimately you can decide how deep you want to integrate.
## 1. Represent protection products
To enable product protection to be added to carts and checked out, you have to have protection products in your inventory. To do this, you will need to add at least one item that represents product protection to your ERP system, either as a service item, a non-fulfillable SKU, or a regular item. The only requirement is that it must have a title and a price with 0% VAT.
The number of product protection items that make sense for you will depend on several factors (e.g., your protection program design, pricing strategy, inventory, ERP system, etc.). Your Hakuna Account Manager will work with you to determine the best course of action and provide you with a list of the items you need, but here's an overview of possible strategies:
* **One-to-all:** A single placeholder item with a dynamic title and dynamic pricing is added to the ERP system to represent all possible product protection plans, which requires you to apply the same configuration (i.e., protection type and bucket pricing) to all products in your inventory that you want to offer protection for.
* **One-to-many:** Several placeholder items with dynamic titles and dynamic pricing are added to the ERP system to represent different product protection plans, which allows you to apply different configurations (i.e., protection type and bucket pricing) to all products within a given price range and category.
* **One-to-one:** Representative items with static titles and static pricing are added to the ERP system for each product protection plan. This approach can lead to a large volume of items in your ERP system and requires ongoing maintenance, but it allows you to apply different configurations (i.e., protection type and direct pricing) to each of your products.
* **Combination:** A combination of one-to-one and one-to-many handling, where one or more placeholder items with dynamic titles and pricing as well as one or more representative items with static titles and pricing are added to the ERP system, which allows you to apply different configurations to your products at differing levels of detail.
Using the list provided to you by your Hakuna Account Manager, add the required products/items representing protection plans to your inventory. Once you have manually created the items, please share the product/item IDs from your system with your Hakuna Account Manager.
## 2. Match protection products to other products
You need to know which plans to sell for which protectable products so you will need to match the protection products you added to the corresponding protectable products in your system. To do that, you can either map them (i.e. using a custom property) or use the [Hakuna API](https://hakuna-api.redoc.ly/#tag/E-commerce-integration/paths/~1plans/get).
## 3. Present protection products to your customers
To enable your customers to purchase product protection, you will need to display the protection products in your desired channel(s) and allow customers to purchase them as an opt-in.
The relationship between protection plans and the protectable products as well as the difference between selection states should always be made clear.
## 4. Manage the cart
Whenever a product is added to the cart and the associated protection product is selected, you must also add the selected protection product to the cart as a line item with a reference to the protected product as a custom property.
Since the quantity of the protection products must always be kept in sync with that of the protected product, even if the protected product is zeroed out (i.e., removed from the cart), you will need to identify the required cart management actions after each cart update. To do that properly, you will also need to keep track of which protection plans were added to which protectable products.
## 5. Share order events
You must notify Hakuna whenever any of the following order events occur so that our platform can create and manage the insurance contracts for your customers accordingly:
* **Order placement event:** When an order is placed in your system
* **Line item fulfillment event:** When one or more line items are fulfilled in your system (e.g., after shipping)
* **Line item refund event:** When one or more line items are refunded in your system (e.g., after a product return)
* **Line item cancellation event:** When one or more line items are cancelled in your system
* **Order cancellation event:** When an entire order is cancelled (e.g., because of a failed payment)
To do this, you can use our [Events API](/sharing-order-events/sharing-order-events-with-the-events-api), our [Shopify app](/sharing-order-events/sharing-order-events-via-the-hakuna-shopify-app) or [share them via CSV](/sharing-order-events/sharing-order-events-via-csv). Please refer to the linked guides to find out more information about the individual requirements for each option.
# Self-service checkout with Hakuna Redirect
With this solution, you can give your customers the opportunity to purchase product protection for all protectable products in their orders by redirecting them to individual Hakuna-hosted Redirect checkouts from the order confirmation page, emails, apps, etc.
## 1. Share order placement event
When an order is placed in your system, you will need to publish an order placement event so that we can match all unprotected products in the order with protection plans. To do this, you can use our [Events API](/sharing-order-events/sharing-order-events-with-the-events-api), our [Shopify app](/sharing-order-events/sharing-order-events-via-the-hakuna-shopify-app) or [share them via CSV](/sharing-order-events/sharing-order-events-via-csv). Please refer to the linked guides to find out more information about the individual requirements for each option.
{% hint style="info" %}
Keep in mind that if you decide to share order placements via CSV, you will not be able to request checkouts for orders in real-time.
{% endhint %}
## 2. Get information about available protection
To find out which products have protection plans available and to get information about them, call our checkouts endpoint and pass us the order ID in an HTTP GET request, specifying the checkout type, which in this case would be Redirect. `GET /checkouts?order_id=order-123&checkout_type=redirect`
Example response
```json
{
"order_id": "ord-123",
"redirect_link": "https://checkout.hellohakuna.com/X2Y45347GXai",
"available_plans": [
{
"line_item_id": "line-item-id-3322",
"product_reference": "prd-iphone14",
"plan_price_amount": 8499,
"plan_price_currency": "eur"
},
{
"line_item_id": "line-item-id-4422",
"product_reference": "prd-airpods-gen3",
"plan_price_amount": 3999,
"plan_price_currency": "eur"
}
]
}
```
The response contains a checkout link which is uniquely generated for each order.
Example Hakuna Redirect Checkout
{% hint style="info" %}
If a line item is not listed in the response, then there is no plan available for that product. If there are no plans available for any of the products in the order, then you will get a 404 error response.
{% endhint %}
## 3. Use the information
Use the information to build a CTA wherever you want to offer product protection to your customers (e.g. the order confirmation page, emails, apps, etc.).
# Guided checkout with Hakuna Assist
With this solution, you can make it easier for your sales and support staff to sell product protection to your customers by displaying information about available plans for purchased products with links to pre-filled Hakuna Assist checkouts in your sales app or CRM tool.
## 1. Share order placement event
When an order is placed in your system, you will need to publish an order placement event so that we can match all unprotected products in the order with protection plans. To do this, you can use our [Events API](/sharing-order-events/sharing-order-events-with-the-events-api), our [Shopify app](/sharing-order-events/sharing-order-events-via-the-hakuna-shopify-app) or [share them via CSV](/sharing-order-events/sharing-order-events-via-csv). Please refer to the linked guides to find out more information about the individual requirements for each option.
{% hint style="info" %}
Keep in mind that if you decide to share order placements via CSV, you will not be able to request checkouts for orders in real-time.
{% endhint %}
## 2. Get information about available protection
To find out which products have protection plans available and to get information about them, call our checkouts endpoint and pass us the order ID in an HTTP GET request, specifying the checkout type, which in this case would be Assist. `GET /checkouts?order_id=order-123&checkout_type=assist`
Example response
```json
{
"order_id": "ord-123",
"assist_link": "https://assist.hellohakuna.com/4U67zMrqGhqq",
"available_plans": [
{
"line_item_id": "line-item-id-3322",
"product_reference": "prd-iphone14",
"plan_price_amount": 8499,
"plan_price_currency": "eur"
},
{
"line_item_id": "line-item-id-4422",
"product_reference": "prd-airpods-gen3",
"plan_price_amount": 3999,
"plan_price_currency": "eur"
}
]
}
```
The response contains a link to a uniquely generated Hakuna Assist checkout with pre-filled order and customer information.
Example Hakuna Assist Checkout
{% hint style="info" %}
If a line item is not listed in the response, then there is no plan available for that product. If there are no plans available for any of the products in the order, then you will get a 404 error response.
{% endhint %}
## 3. Display the information
Display the information in your sales app or CRM tool.
# Frontend widget integration
The Hakuna widget is a quick and easy way to offer your customers product protection in your online store without having to add protection products to your ERP system or handle the insurance premiums. Once customers complete their transaction with you, they'll be able to click a link to a Hakuna-hosted payment page where they can activate their chosen product protection plan.
To offer your customers product protection with the frontend widget, all you need to do is initialize the Hakuna widget and then display it on your product detail pages, in the cart, and at checkout.
We'll walk you through the three steps below:
## 1. Initialize the widget
To ensure that your widget configuration loads properly and your customers see your tailored protections, content, and design, add the following script to each page you want to display the widget on:
## 2. Render the widget
To actually display the offering on a page and give your customers the option to add product protection to the products they're purchasing, you need to render the widget on the product detail page, in the cart, and/or at checkout. It's up to you which placement option(s) you choose, but you will need to choose at least one!
### On the product detail page
On the product detail page, the widget gives customers the option to add product protection to a product before they add it to the cart. If they click on the link to learn more, a modal with a button to add protection and more information about the offering will pop up.
Product detail page example
Modal example
To render the widget on the product detail page, define a `
` with two `data-*` attributes by placing the following code where you want the widget to be displayed on the page:
```html
```
Within the widget components, pass us the following properties as a JSON string:
```typescript
interface HakunaDetailsPageProps {
productId: string;
productBrand: string;
productTitle: string;
hakunaProductCategory: number; // provided by Hakuna
productPriceAmount: number; // product price in cents
productPriceCurrency: 'eur'; // product price currency code
}
```
Example
```html
```
### In the cart
In the cart, the widget enables customers to add and/or manage their product protection for each line item. They can see which products they have already opted to add protection to, add protection to any unprotected products, and remove previously added protection.
Cart example
To render the widget in the cart, place the following code below each item in the cart:
```html
```
Within the widget components, pass us the following properties as a JSON string:
```typescript
interface HakunaCartItemProps {
productId: string;
productBrand: string;
productTitle: string;
hakunaProductCategory: number;
productPriceAmount: number; // product price in cents
productPriceCurrency: 'eur'; // product price currency code
itemQuantity: number;
}
```
If the quantity of a cart item is updated, the quantity passed to the associated Hakuna cart item components should also be updated.
If a cart item is removed from the cart, the associated Hakuna cart item component should also be removed from the page.
Example
```html
```
### At checkout
At checkout, the widget gives customers another opportunity to add and/or manage their product protection. They can still adjust the product protection as they see fit by adding or removing it.
Checkout example (address)
To render the widget at checkout, place the following code below each item:
```html
```
Within the widget components, pass us the following properties as a JSON string:
```typescript
interface HakunaCheckoutItemProps {
productId: string;
productBrand: string;
productTitle: string;
hakunaProductCategory: number;
productPriceAmount: number; // product price in cents
productPriceCurrency: 'eur'; // product price currency code
itemQuantity: number;
}
```
Example
```html
```
## 3. Confirm checkout
To pass the required transaction data to Hakuna after a successful purchase in your shop and display confirmation to the customer (including a CTA for them to complete payment and activate their protection), you will need to render the widget on your order confirmation page.
Confirmation example
To render the widget at purchase confirmation, place the following code where you want the widget to be displayed:
```html
```
Within the widget components, pass us the following properties as a JSON string:
```typescript
interface HakunaCheckoutConfirmationProps {
orderId: string; // identifier of an order placed for checkout
customer: {
email: string;
firstName: string;
lastName: string;
};
customerBillingAddress: {
line1: string;
line2 string;
zipCode: string;
city: string;
country: 'de'; // 2-letter country code
};
purchasedItems: Array<{
productId: string;
itemQuantity: number;
}>;
}
```
Example
```html
```
That's all you need to do!
***
## What happens after checkout confirmation?
We will send customers an email with a link to the payment page immediately after they complete their purchase in your store.
Example email
Whether they click on the link on your order confirmation page or in the email, the customer will be redirected to the Hakuna payment page.
Hakuna payment page example
Once the customer completes their payment for product protection, we will fully activate their protection, and send them a confirmation email with their insurance documents.
## On customizing the widget
The widget is fully customizable, so we can adjust the colors, fonts, branding, content, etc. to make it perfectly fit your business! Just contact your Hakuna Onboarding Team for more information.
[^1]: Provided by Hakuna
# Hakuna Assist for your sales app or CRM tool
This content has been moved, please refere to the updated guide:
{% content-ref url="/pages/KYndDeNDYUwnCmsk0EoX" %}
[Guided checkout with Hakuna Assist](/integration-guides/guided-checkout-with-hakuna-assist)
{% endcontent-ref %}
# Hakuna Redirect on the e-commerce order confirmation page
This content has been moved, please refer to the updated guide:
{% content-ref url="/pages/gsLMuSDhFHf2HRHw0bkT" %}
[Self-service checkout with Hakuna Redirect](/integration-guides/self-service-checkout-with-hakuna-redirect)
{% endcontent-ref %}
# Shopify app integration
In this guide, you'll learn how to install and configure the Hakuna Shopify app so that you can start selling Hakuna product protection in no time.
#### Initial setup
1. [Install the Hakuna app](/integration-guides/shopify-app-integration/initial-setup/install-the-hakuna-app)
2. [Enable app embed in your theme](/integration-guides/shopify-app-integration/initial-setup/enable-app-embed-in-theme)
3. [Add the Hakuna app to your product pages](/integration-guides/shopify-app-integration/initial-setup/add-app-to-product-pages)
#### Further settings
1. [Add a data privacy snippet](/integration-guides/shopify-app-integration/further-settings/add-a-data-privacy-snippet)
2. [Adjust your invoice](/integration-guides/shopify-app-integration/further-settings/adjust-your-invoice)
3. [Hide Hakuna protection from your collection](/integration-guides/shopify-app-integration/further-settings/hide-hakuna-protection-from-your-collection)
4. [Hide Hakuna protection from your navigation](/integration-guides/shopify-app-integration/further-settings/hide-hakuna-protection-from-your-navigation)
# Initial setup
1. [Install the Hakuna app](/integration-guides/shopify-app-integration/initial-setup/install-the-hakuna-app)
2. [Enable app embed in your theme](/integration-guides/shopify-app-integration/initial-setup/enable-app-embed-in-theme)
3. [Add the Hakuna app to your product pages](/integration-guides/shopify-app-integration/initial-setup/add-app-to-product-pages)
# Install the Hakuna app
{% hint style="info" %}
You'll **need access to the Hakuna merchant console** to get your custom installation link. If you don't have an account yet, [get in touch with us](/help/contact). We'll send you an email with a link and a temporary password once your account has been set up.
{% endhint %}
#### 1. Add the Hakuna app to your Shopify store
* Log into the Hakuna merchant console and click on the store you want to configure
* In the Integration section, click **Install Shopify App**
* Log into your **Shopify** account
* Click the **Install app** button on the app listing page
* You'll be redirected to your **Shopify admin**
* In your Shopify admin, click **Install app** to authorize the use of the app
Once you've installed the Hakuna Shopify app, you can view and access it from the **Apps** page in your Shopify admin.
# Enable app embed in theme
* Open your Shopify admin, and go to **Online Store -> Themes**
* Find the theme you want to edit, and click **Customize**
* In the sidebar, select **App embeds**
* Find the Hakuna app and click the toggle next to it to activate it
* Click **Save**
# Add app to product pages
You can display Hakuna product protection on your product pages by customizing your theme. All you have to do is **add a new app block** to the product page template. You'll only need to do this once since the changes will be applied to all of your products using this template.
### Here's how it works
* Open your Shopify admin, and go to **Online Store -> Themes**
* Find the theme you want to edit, and click **Customize**
* Navigate to the **product page** and select the template you want to add Hakuna to
* In the sidebar, click **Product Information** -> **Add block** and select the **Hakuna protection widget**
* Position it above the **Buy buttons** to ensure the best visibility
{% hint style="info" %}
Don't forget to click **Save** 😉
{% endhint %}
# Further settings
You have **completed the initial setup** and started offering product protection to your customers. There are just a few steps left:
1. [Add a data privacy snippet](/integration-guides/shopify-app-integration/further-settings/add-a-data-privacy-snippet)
2. [Adjust your invoice template](/integration-guides/shopify-app-integration/further-settings/adjust-your-invoice)
3. [Hide Hakuna protection from your collection](/integration-guides/shopify-app-integration/further-settings/hide-hakuna-protection-from-your-collection)
4. [Hide Hakuna protection from your navigation](/integration-guides/shopify-app-integration/further-settings/hide-hakuna-protection-from-your-navigation)
{% hint style="success" %}
**Now you're ready** to offer Hakuna protection to your customers!
{% endhint %}
# Add a data privacy snippet
{% hint style="info" %}
All you need to do is **include the following snippet in your data privacy declaration**
{% endhint %}
{% tabs %}
{% tab title="German Version" %}
***§X Hakuna Produktschutz***
*Bei Abschluss Ihres Versicherungsschutzes stellen Sie Hakuna Ihre für die Vertragsausführung erforderlichen personenbezogenen Daten im Rahmen des Checkouts (Antragsdaten) zur Verfügung. Hakuna verarbeitet diese Daten im Auftrag des jeweiligen Versicherungsunternehmens, soweit dies für den Abschluss und die Durchführung des Versicherungsvertrages notwendig ist. Daneben werden versicherungstechnische Daten, wie Kundennummer, Versicherungssumme, Versicherungsdauer und Beitrag (Vertragsdaten) sowie erforderlichenfalls die Bankdaten, Rechnungen, Angaben eines Dritten (z.B. eines Reparatur-Dienstleisters) und Ihre Angaben zum Schaden (Leistungsdaten) verarbeitet und gespeichert.*
*Die Verarbeitung erfolgt zur Erbringung Ihres Versicherungsschutzes gemäß Art. 6 Abs. 1 lit. b DSGVO aufgrund Ihrer Einwilligung gemäß Art. 6 Abs. 1 lit. a DSGVO. Ihre Daten verarbeitet Hakuna auch, um berechtigte Interessen von Hakuna oder von Dritten (z.B. zur Gewährleistung der IT-Sicherheit, Verhinderung von Straftaten) gemäß Art. 6 Abs. 1 lit. f DSGVO zu wahren oder um gesetzliche Verpflichtungen (z.B. aufsichtsrechtlicher Vorgaben, Aufbewahrungspflichten) gemäß Art. 6 Abs. 1 lit. c DSGVO zu erfüllen.*
{% endtab %}
{% tab title="English Version" %}
***§X Hakuna product protection***
*Upon purchase of your insurance policy, you will provide Hakuna with the personal data required for the execution of the contract as part of the checkout process (application data). Hakuna will process this data on behalf of the insurance company to the extent necessary for the formation and execution of the insurance contract. In addition, insurance-related data such as customer number, sum insured, insurance period and premium (contract data) as well as, if necessary, bank data, invoices, details of a third party (e.g. a repair service provider) and the details your provide regarding the damage (performance data) will be processed and stored.*
*Processing is carried out for the provision of your insurance coverage in accordance with Art. 6 (1) lit. b GDPR based on your consent in accordance with Art. 6 (1) lit. a GDPR. Hakuna also processes your data to protect legitimate interests of Hakuna or third parties (e.g. to ensure IT security, prevent criminal acts) pursuant to Art. 6 para. 1 lit. f GDPR or to comply with legal obligations (e.g. regulatory requirements, retention obligations) pursuant to Art. 6 para. 1 lit. c GDPR.*
{% endtab %}
{% endtabs %}
# Adjust your invoice
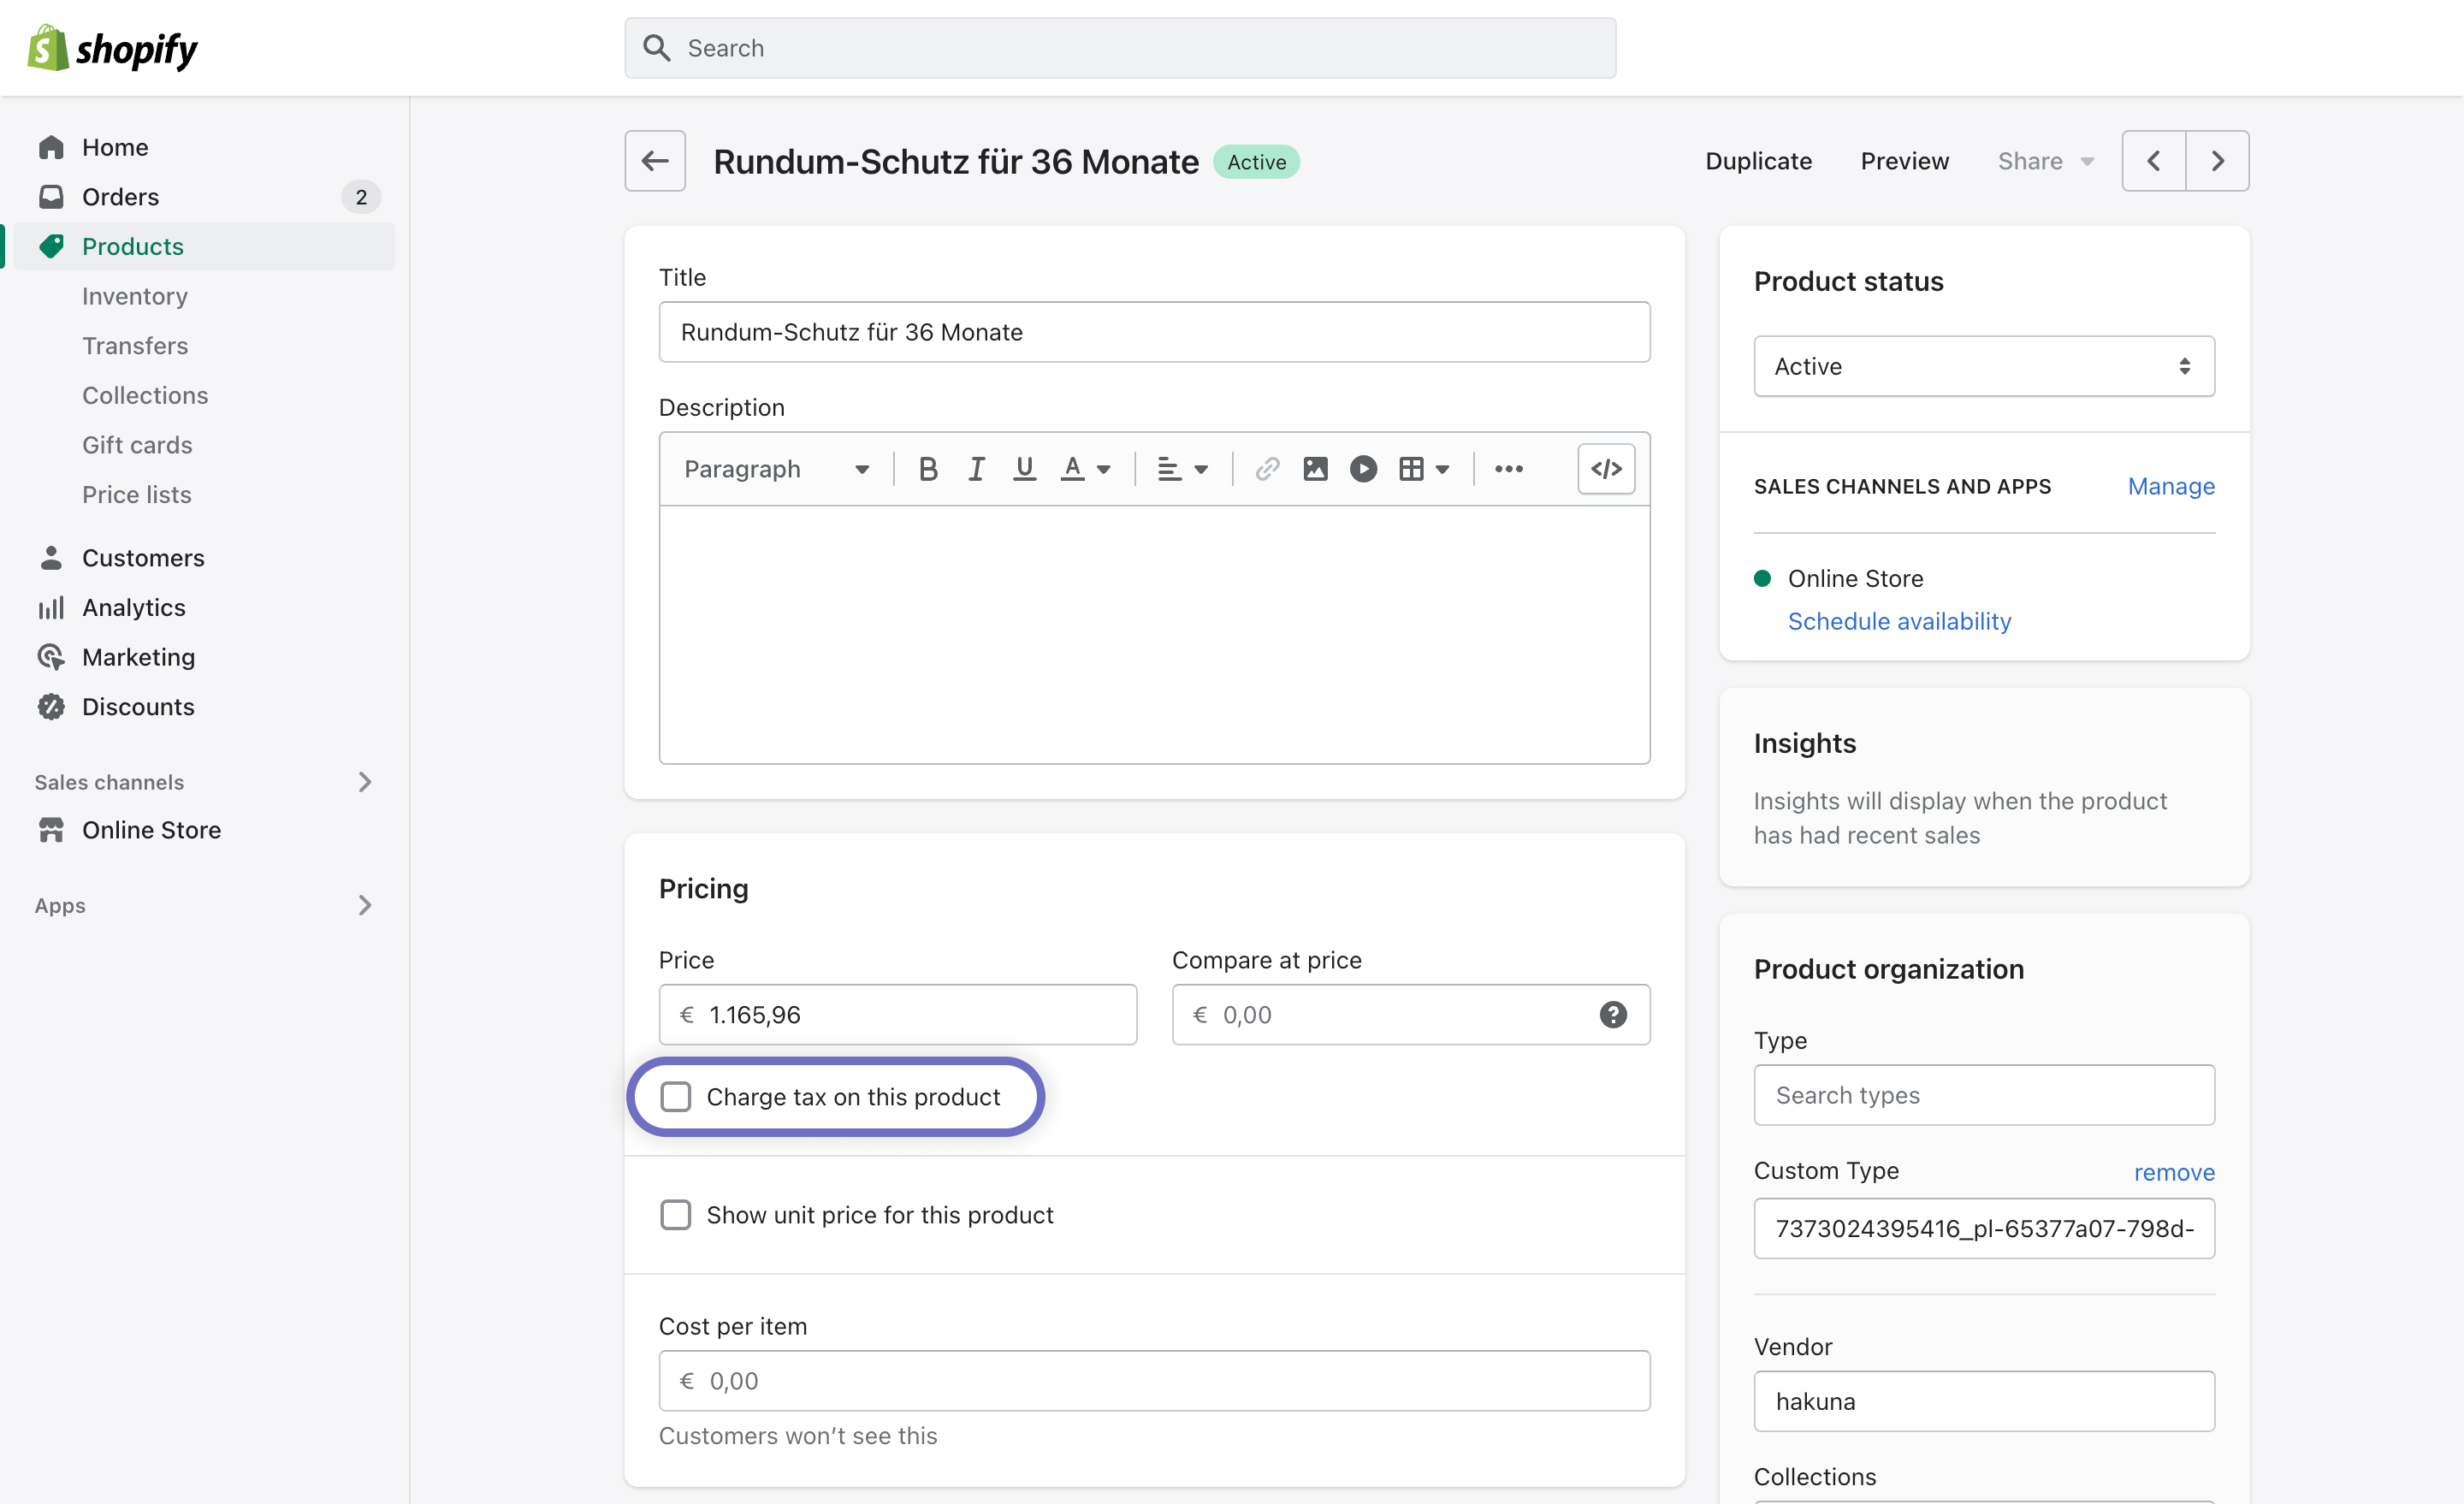
The Hakuna app will create pretection products in your product catalog. Since the price already includes insurance tax, it is exempt from other tax (e.g. VAT). The **Charge tax on this product** option will be unchecked by default on all Hakuna product protection so you won't need to change anything.
Hakuna product protection is exempt from tax
#### Display Hakuna correctly on your invoices
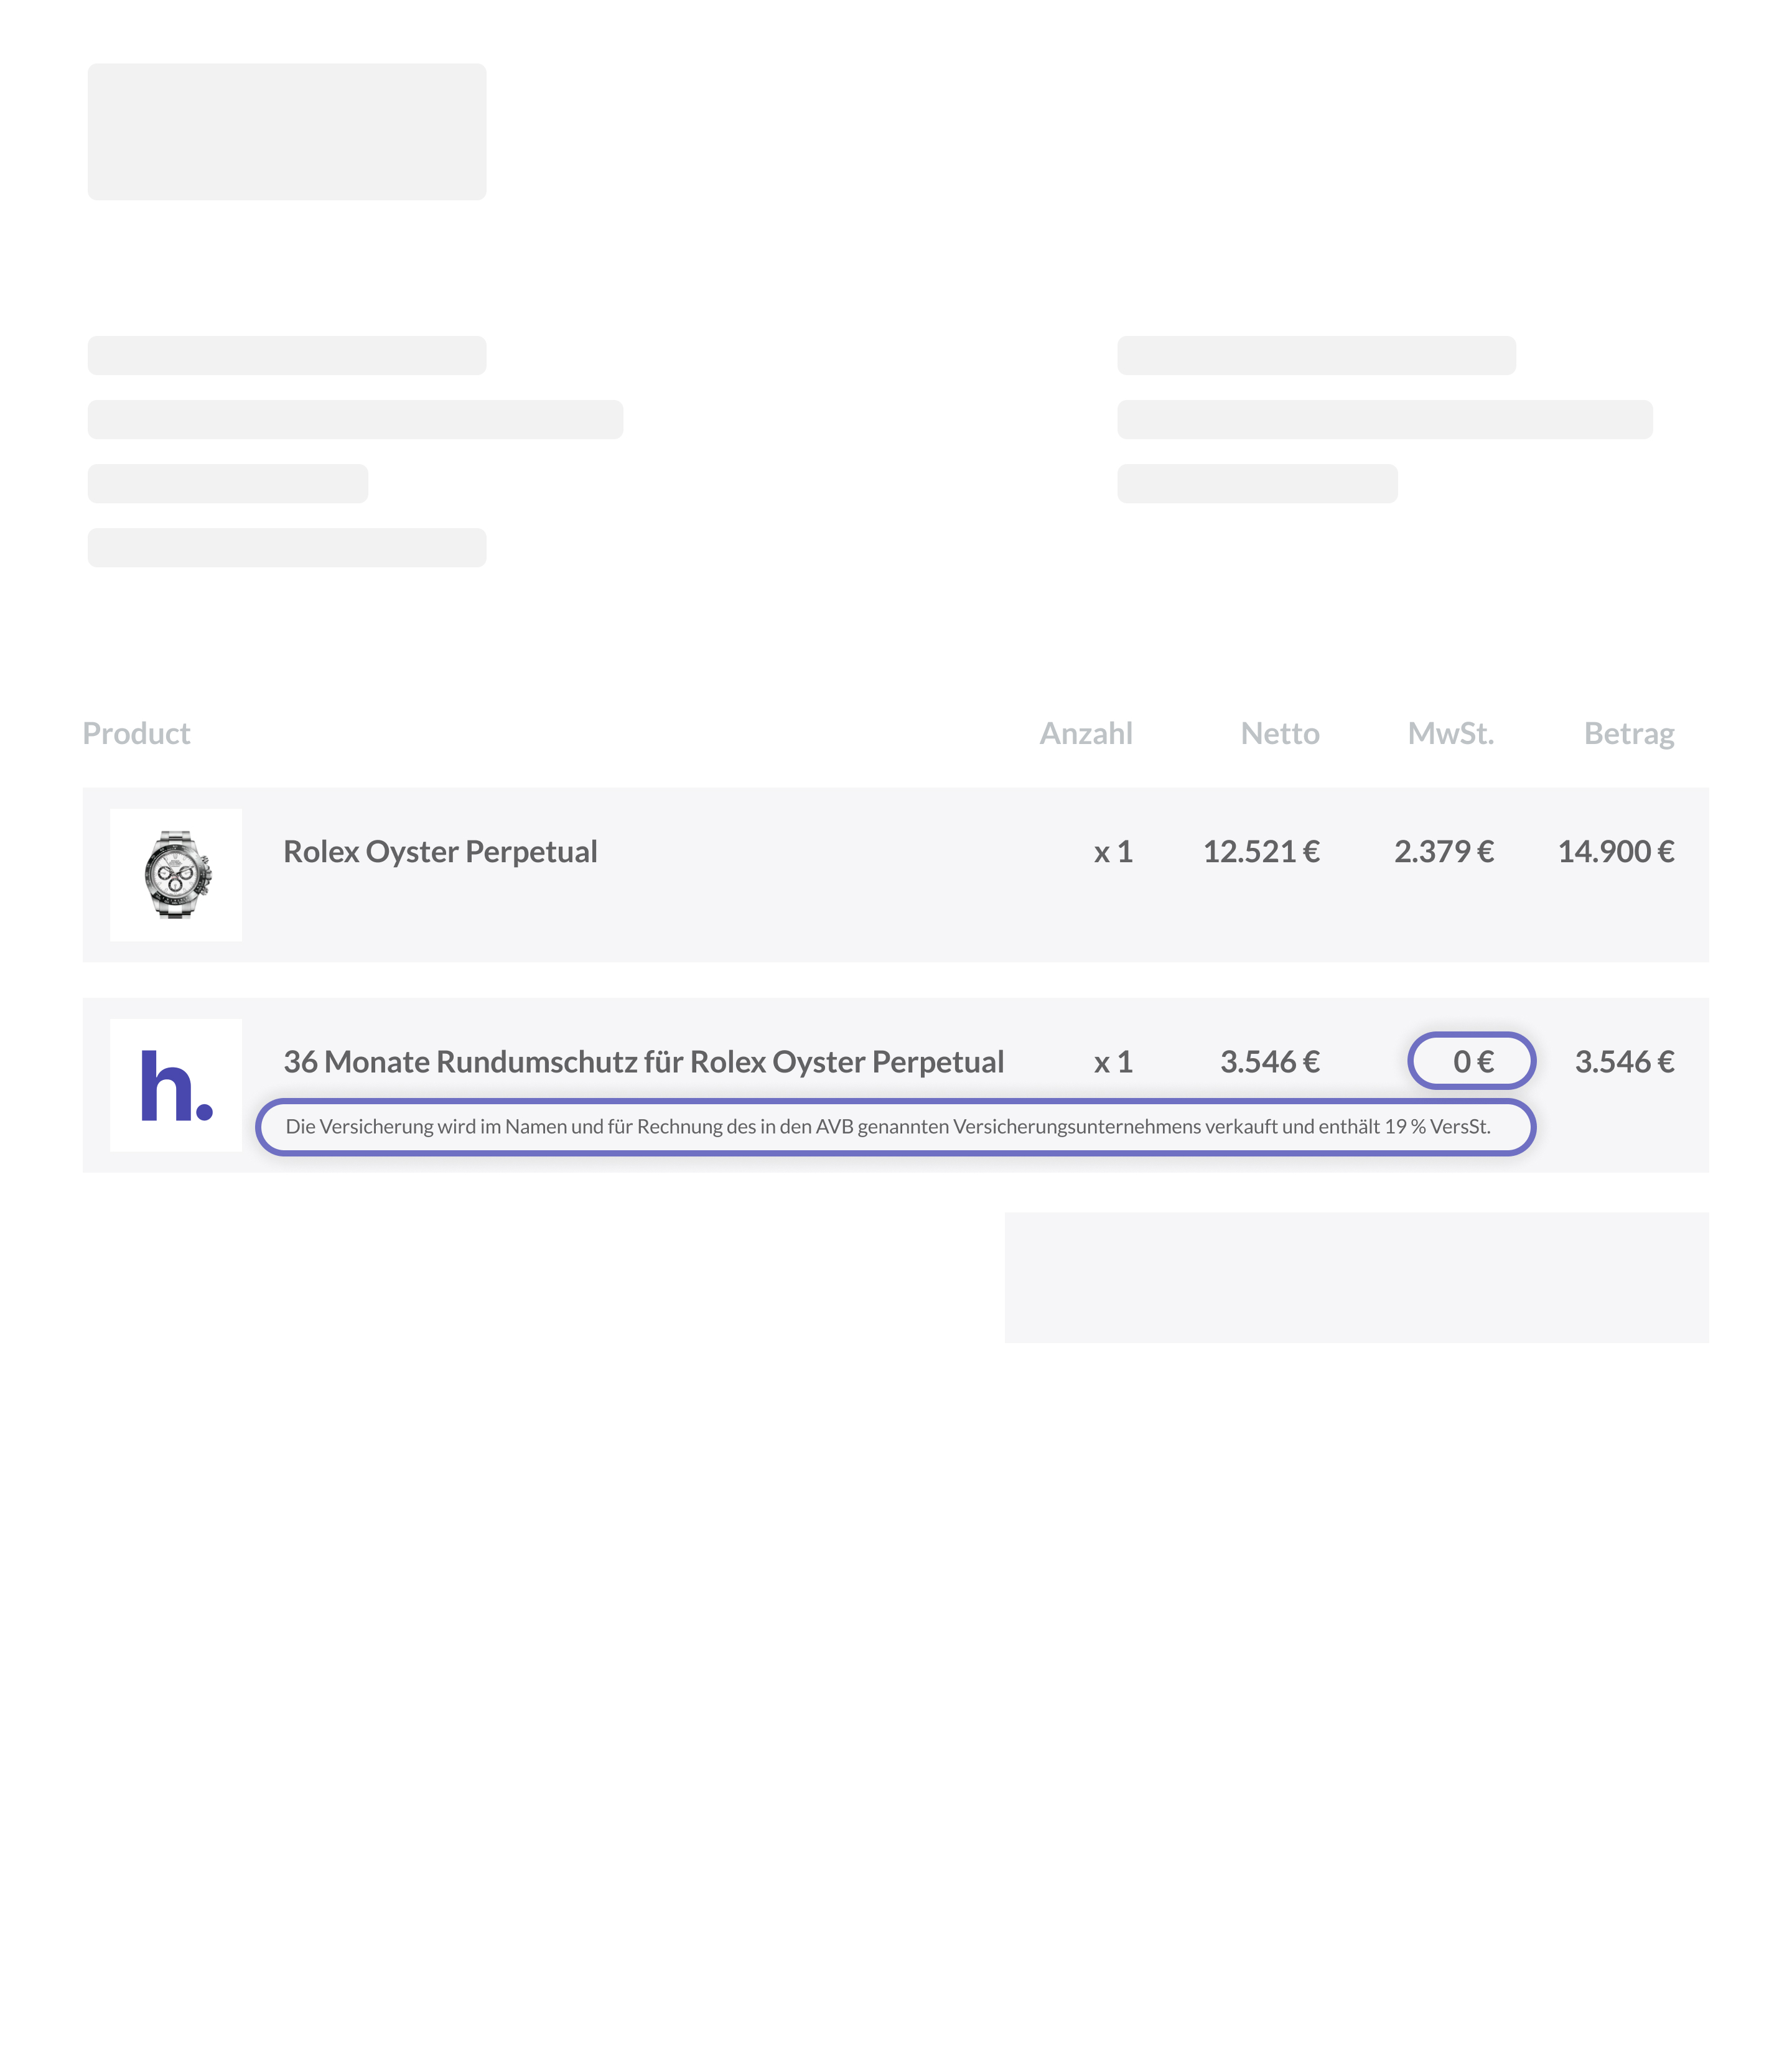
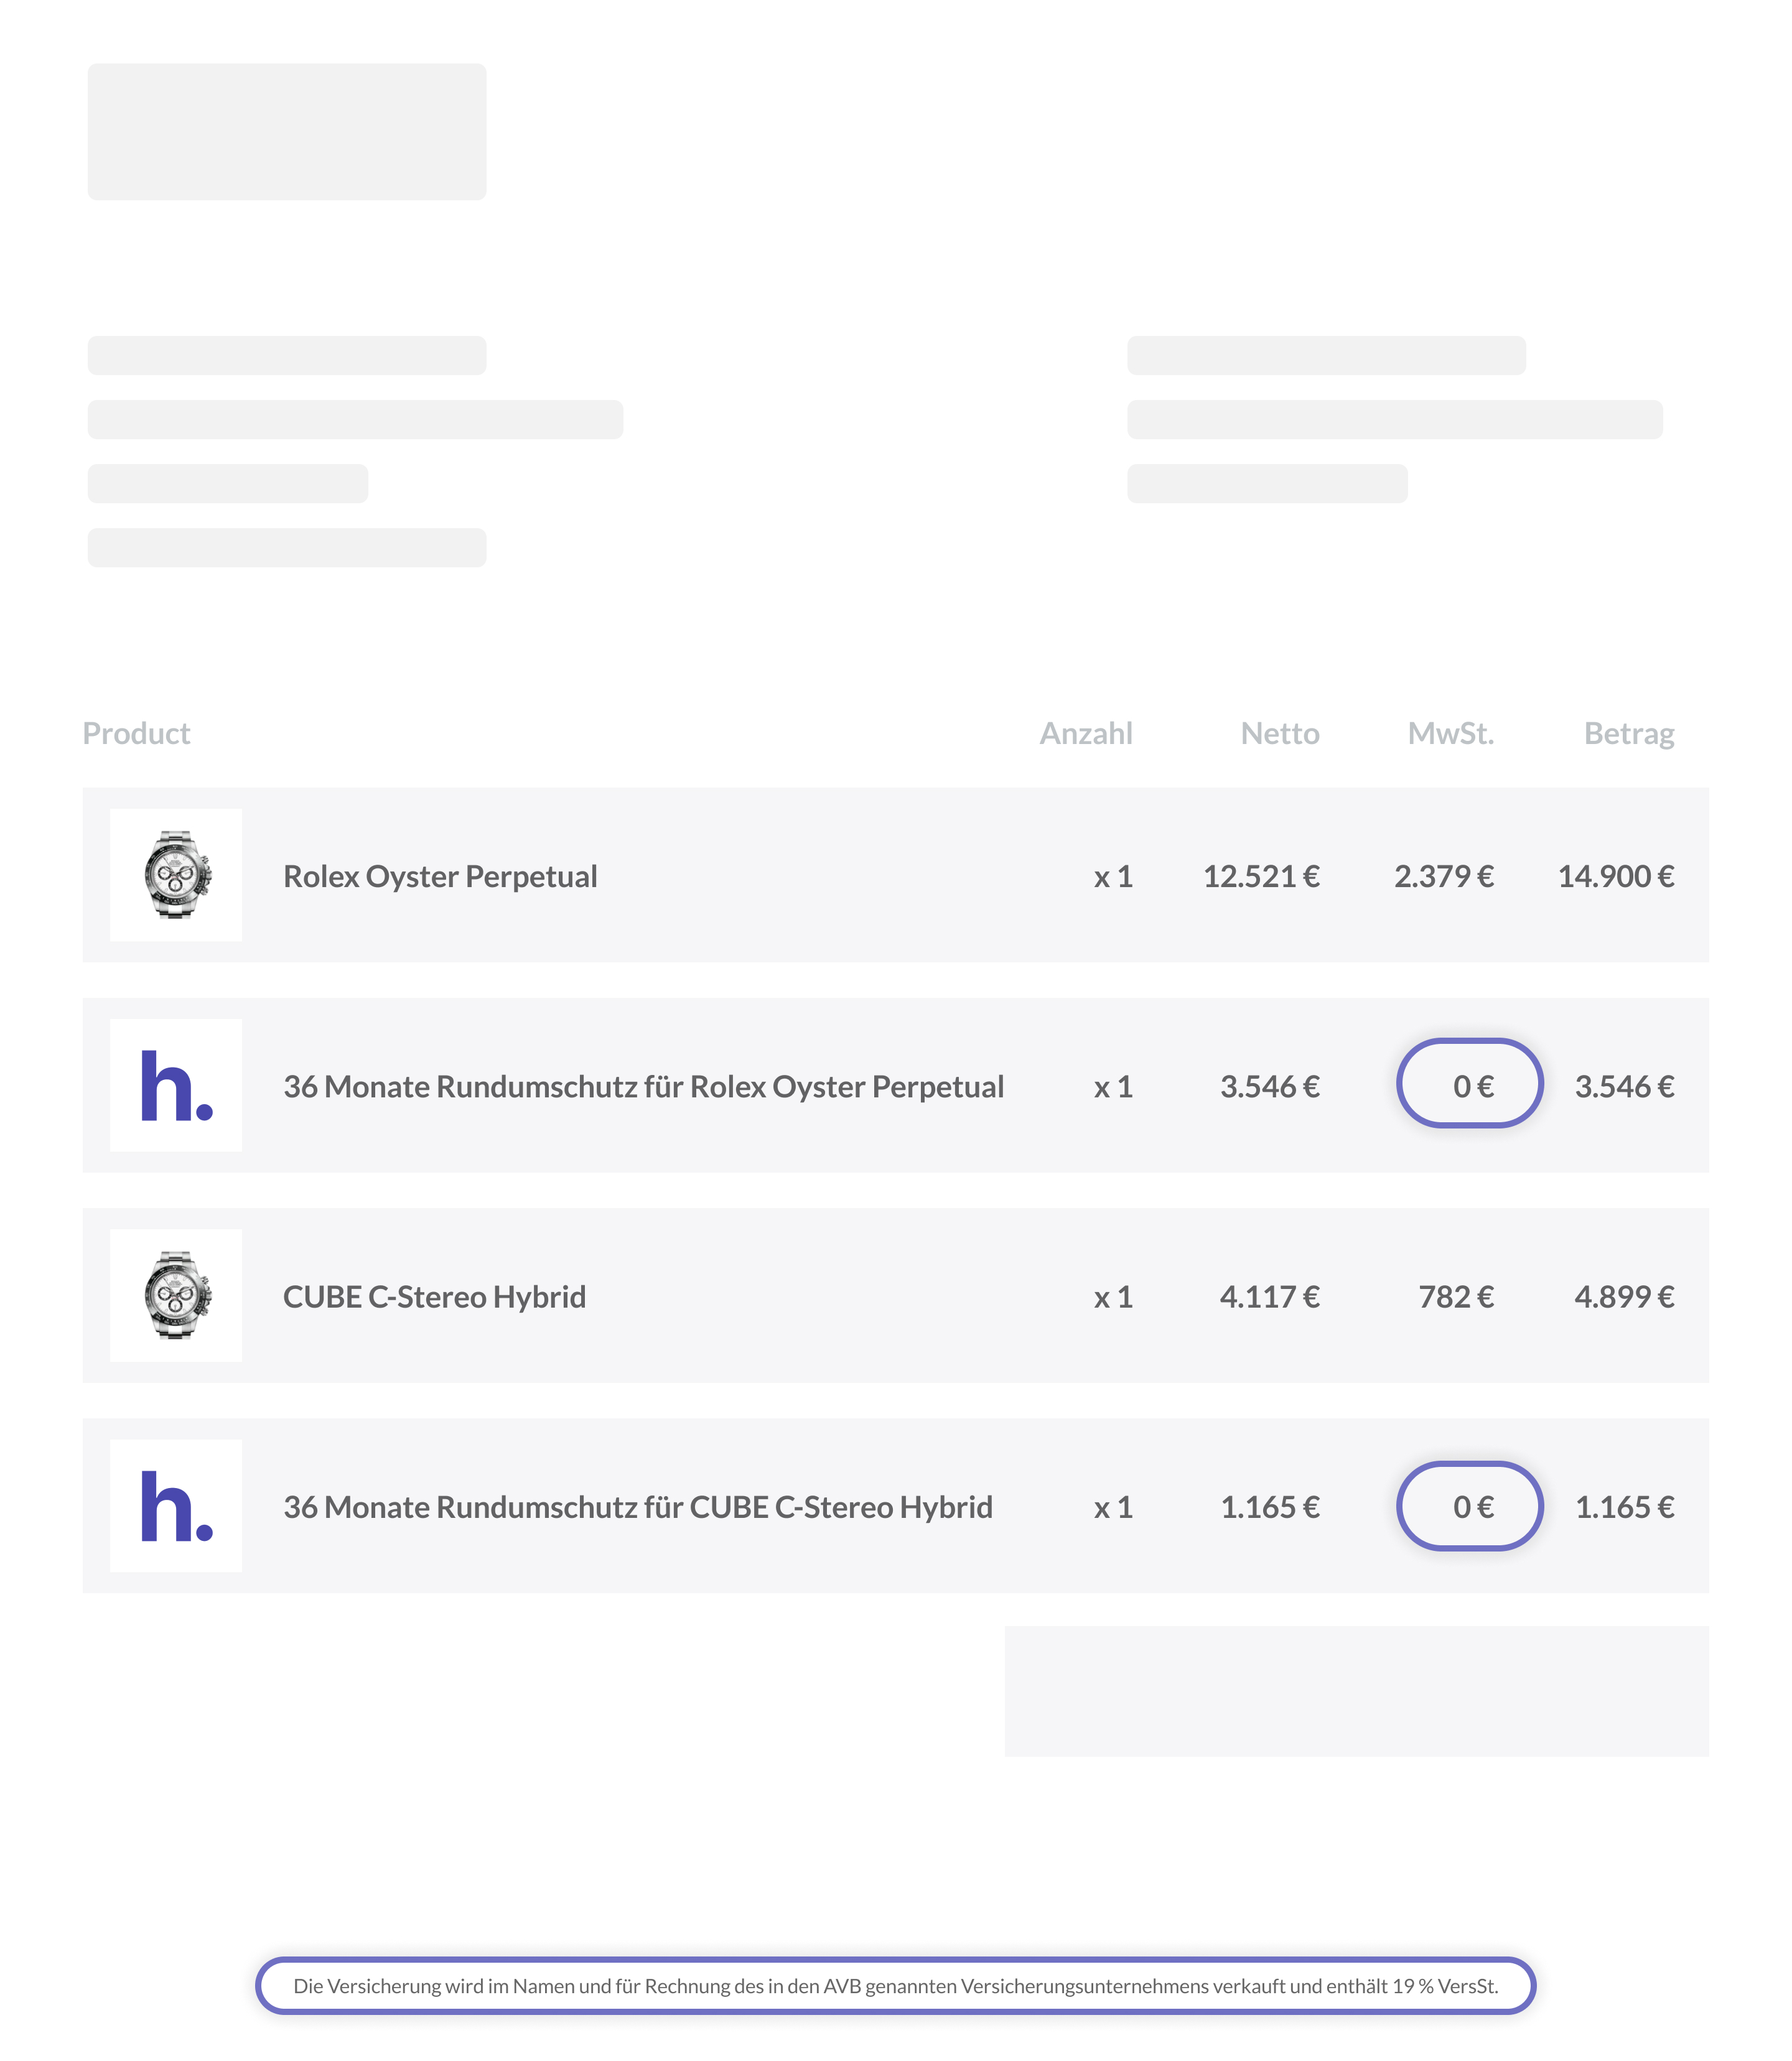
* Make sure that you list the **gross price** **without VAT** for each Hakuna product protection plan on your invoice
* Add the following **disclaimer** to your invoice, either next to each Hakuna product or once, e.g. in the footer:
> *Die Versicherung wird im Namen und für Rechnung des in den AVB genannten Versicherungsunternehmens verkauft und enthält 19 % VersSt.*
> *The insurance is sold on behalf of and for the account of the insurance company specified in the General Insurance Conditions and includes 19% IPT.*
{% tabs %}
{% tab title="Option 1" %}
#### Show disclaimer next to each product
{% endtab %}
{% tab title="Option 2" %}
#### Show disclaimer in the invoice footer
{% endtab %}
{% endtabs %}
# Hide Hakuna protection from your collection
Hakuna protection products can't be sold as a standalone product so you'll need to hide Hakuna products from your collection(s) to avoid confusion.
{% hint style="success" %}
If you have a **manual collection** or you don't have a collection listed on your store with all available products, you won't have to change anything. Just make sure not to add any Hakuna product protection plans to any of your collections.
{% endhint %}
If you do have an **automated collection**, you'll need to add a new **selection condition**. Here's how:
* From your Shopify admin, go to **Products** **->** **Collections**
* Click an existing automated collection and scroll to the **Conditions** section (if the collection is manual, you won't see this section)
* Click **Add another condition** and select **Product vendor** from the first drop-down list
* Select **is not equal to** from the second drop-down list and enter `hakuna` in the third field
* Make sure **Products must match** is set to **all conditions**
* Click **Save** and repeat this process for any other automated collections displayed in your store
If you display **All products** anywhere in your shop, you'll need to follow these additional steps:
* In your Shopify admin, go to **Online Store -> Themes**
* Find your current theme, and click **Customize**
* Navigate to the page that you need to edit (the one displaying **All products**)
* Click **Featured collection**
* Under Collection, click **Change** **->** **Change collection**
* Select a new collection (make sure the new collection doesn't include any Hakuna product protection plans)
* Click **Select**
* Click **Save**
# Hide Hakuna protection from your navigation
If your menu has a **Catalog** section that is set to display **All products**, you'll need to follow these additional steps:
* From your Shopify admin, go to **Online Store** **->** **Navigation**
* In the **Menus** section of the **Navigation** page, click the title of the menu that includes the Catalog item
* In the **Menu items** section, click **Catalog -> Edit**
* Click the `x` in the **Link** field to remove **All products**, and then select a new destination (make sure the new destination doesn't include any Hakuna product protection plans)
* Click **Apply changes**
* Click **Save menu**
# Sharing order events with the Events API
You can share order events with us via the Hakuna API so we can create and manage the insurance contracts appropriately.
### Publish order placement events
Whenever an order is placed in your system, publish an order placement event by calling our [events endpoint](https://hakuna-api.redoc.ly/#tag/ERP-integration/paths/~1events/post) and passing us order, customer, and product information (including a [`product_reference`](https://hakuna-api.redoc.ly/#tag/ERP-integration/paths/~1events/post!path=0/payload/line_items/custom_properties/product_reference\&t=request) for any protection products in the order):
Example
Request:
```bash
curl -X POST 'https://api.hellohakuna.com/sandbox/events' \
-H 'Bearer: sk_test_4eC39HqLyjWDarjtT1zdp7dc' \
-H 'Content-Type: application/json' \
-d '{
"type": "order_placed",
"payload": {
"order_id": "ord-123",
"placed_at": "2022-02-20T00:00:00.000Z",
"order_currency": "eur",
"customer": {
"first_name": "Max",
"last_name": "Mustermann",
"email": "max.mustermann@example.com"
},
"customer_billing_address": {
"address_line_1": "Musterstrasse",
"address_line_2": "1",
"city": "Musterstadt",
"country": "de",
"zip": "123456"
},
"line_items": [
{
"id": "line-item-id-3311",
"quantity": 1,
"price_amount": 89900,
"product_id": "prd-iphone14",
"product_title": "iPhone 14",
"product_brand": "Apple"
},
{
"id": "line-item-id-3322",
"quantity": 1,
"price_amount": 8499,
"product_id": "protection-item-id-323",
"product_title": "Hakuna.care protection",
"product_brand": "Hakuna",
"custom_properties": {
"product_reference": "prd-iphone14"
}
},
{
"id": "line-item-id-4411",
"quantity": 1,
"price_amount": 25500,
"product_id": "prd-airpods-gen3",
"product_title": "Airpods 3rd Generation",
"product_brand": "Apple"
}
]
}
}'
```
Response:
```json
{
"event_id": "evt-7c1784a1-d96b-4ec6-b515-8dc4a5433cbe"
}
```
As a response, you'll receive the generated event ID.
### Publish line item fulfillment events
Whenever you ship any of the products in an order, publish the line item fulfillment events for the fulfilled products by calling our [events endpoint](https://hakuna-api.redoc.ly/#tag/ERP-integration/paths/~1events/post) and passing us the order ID and a list of the fulfilled line items.
{% hint style="info" %}
Hakuna does not require you to fulfill protection plan line items, but it may make sense to have your ERP system automatically fulfill them when the associated product is fulfilled.
{% endhint %}
Example request
```bash
curl -X POST 'https://api.hellohakuna.com/sandbox/events' \
-H 'Bearer: sk_test_4eC39HqLyjWDarjtT1zdp7dc' \
-H 'Content-Type: application/json' \
-d '{
"type": "order_fulfillment_added",
"payload": {
"order_id": "ord-123",
"fulfillment_items": [
{
"line_item_id": "line-item-id-3311",
"quantity": 1,
"fulfilled_at": "2022-02-21T12:51:14.158Z"
},
{
"line_item_id": "line-item-id-4411",
"quantity": 1,
"fulfilled_at": "2022-02-21T12:51:14.158Z"
}
]
}
}'
```
As a response, you'll receive the generated event ID.
### Publish line item refund events
Whenever you refund any products in an order, publish the line item refund events by calling our events endpoint and passing us the order ID and a list of the refunded line items. Keep in mind that whenever a protected product is refunded, you must also refund the associated protection product.
Example request
```bash
curl -X POST 'https://api.hellohakuna.com/sandbox/events' \
-H 'Bearer: sk_test_4eC39HqLyjWDarjtT1zdp7dc' \
-H 'Content-Type: application/json' \
-d '{
"type": "order_refund_added",
"payload": {
"order_id": "ord-123",
"refund_items": [
{
"line_item_id": "line-item-id-3311",
"quantity": 1,
"refunded_at": "2022-02-21T12:51:14.158Z"
},
{
"line_item_id": "line-item-id-3322",
"quantity": 1,
"refunded_at": "2022-02-21T12:51:14.158Z"
},
{
"line_item_id": "line-item-id-4411",
"quantity": 1,
"refunded_at": "2022-02-21T12:51:14.158Z"
}
]
}
}'
```
As a response, you'll receive the generated event ID.
### Publish line item cancellation events
Whenever you cancel any products in an order, you will need to publish the line item cancellation events by calling our events endpoint and passing us the order ID and a list of the cancelled line items. Keep in mind that whenever a protected product is cancelled, you must also cancel the associated protection product.
Example request
```bash
curl -X POST 'https://api.hellohakuna.com/sandbox/events' \
-H 'Bearer: sk_test_4eC39HqLyjWDarjtT1zdp7dc' \
-H 'Content-Type: application/json' \
-d '{
"type": "order_line_items_cancelled",
"payload": {
"order_id": "ord-123",
"cancelled_line_items": [
{
"line_item_id": "line-item-id-3311",
"cancelled_at": "2022-02-21T12:51:14.158Z"
},
{
"line_item_id": "line-item-id-3322",
"quantity": 1,
"refunded_at": "2022-02-21T12:51:14.158Z"
}
]
}
}'
```
As a response, you'll receive the generated event ID.
### Publish order cancellation events
Whenever an entire order is cancelled for any reason, publish an order cancellation event by calling our events endpoint and passing us the order ID and the date and time the order was cancelled at.
Example request
```bash
curl -X POST 'https://api.hellohakuna.com/sandbox/events' \
-H 'Bearer: sk_test_4eC39HqLyjWDarjtT1zdp7dc' \
-H 'Content-Type: application/json' \
-d '{
"type": "order_cancelled",
"payload": {
"order_id": "ord-123",
"cancelled_at": "2022-02-20T15:00:00.000Z"
}
}'
```
As a response, you'll receive the generated event ID.
# Sharing order events via the Hakuna Shopify app
You can use the Hakuna Shopify app to automatically share order events with Hakuna if your e-commerce store is running on Shopify.
## 1. Install the app
To install the Hakuna Shopify app, click the install link your Hakuna Account Manager shared with you and then click **Install app** in your Shopify admin.
If you have not received an install link yet, please reach out to your Hakuna Account Manager.
## 2. Attach custom property to protection cart line items
Add a [line item property](https://shopify.dev/docs/api/liquid/objects/line_item#line_item-properties) with the name `_hakuna_protected_product_ref` and a value referencing the associated protectable product (i.e., product or variant ID) to every cart line item containing a protection product so that we know which protected product it is connected to.
# Sharing order events via CSV
You can submit order events as CSV files to Hakuna so we can create and manage the insurance contracts appropriately.
{% hint style="info" %}
This guide outlines the general requirements for sharing order events via CSV. If you are interested in this approach, please inform your Hakuna Account Manager. They will work with you to establish the specific requirements for your use case.
{% endhint %}
## File requirements
The CSV file must be comma separated and UTF-8 encoded.
The file name must be unique.
Each row in the CSV file should represent an item in an order, with data identifying:
* the order ID
* the date and time at which the order was placed
* if cancelled, the date and time at which the order was cancelled
* if fulfilled, the date and time at which the line item was fulfilled
* if refunded, the date and time at which the line item was refunded
* the customer details (name, email, address)
* the product details (line item ID, product ID, brand, title, price amount and currency)
All protection products should also have a reference to the product for which the protection was purchased.
If a product has a quantity of 2, it should be represented by two rows. Protection products should also be represented as separate rows.
You can determine the file structure (e.g., data formatting, column titles, etc.) based on what is available to you. Hakuna will transform and ingest the data into our platform as needed.
## Upload
We will provide you with a AWS account with access to a shared S3 bucket where you can upload the CSV files using the AWS console.
## Frequency
You can choose the frequency of data submission. New uploads will be processed immediately, as long as they have a unique file name.
# Authentication
Hakuna uses API keys to authenticate all requests, and authentication is handled via Bearer Authentication.
When you make an API request, you'll need to pass either your **sandbox secret key** or your **live secret key** in the HTTP `Authorization` header. Which key you use depends on the [environment](/using-the-api/environments) you're using.
```bash
curl https://api.hellohakuna.com/ \
-H "Authorization: Bearer "
```
If you do not enter a valid API key in your request, you will get a [`401` response (unauthorized)](/using-the-api/responses).
### Getting your API keys
You can view and manage your API keys for both the production and sandbox environments in the [Hakuna merchant console](https://console.hellohakuna.com/).
{% hint style="info" %}
**Get access to the Hakuna merchant console**\
Once your merchant console account has been created, you'll get an email with a temporary password. Click the link in the email to set a new password and complete your account setup. If you have not yet received an email, please [let us know](/help/contact).
{% endhint %}
Please be aware that any changes made to existing API keys will take effect immediately and could cause unintended side effects.
### Managing your API keys
Your API keys carry many privileges, so it is important to keep them private and secure. They should live primarily in your backend, and should never be exposed on your frontend.
Do not hardcode or share your API keys (particularly in your source version control system).
# Versioning
We regularly update the Hakuna API as we release new features.
To enable you to update your integration when you're ready, we allow for a `Hakuna-Version` header to be passed on all API requests:
```bash
curl https://api.hellohakuna.com/ \
-H "Hakuna-Version: v2.0"
```
The current version of the Hakuna API is v2.0. If you omit the version header, your request will default to the **earliest supported version** of the API, which is currently v1.1.
# Environments
Hakuna has two environments available: sandbox and production. Each environment has a unique URL and requires a unique [API key](/using-the-api/authentication).
**Sandbox environment:** `https://api.hellohakuna.com/sandbox/`
**Production environment:** `https://api.hellohakuna.com/`
### Using the sandbox environment
The Hakuna sandbox is a testing environment that simulates the live production environment. It has the same set of features as the production environment. You should use the sandbox to fully test and develop your integration. Before you switch to the production environment, you should have successfully [tested](/using-the-api/testing) all order events (placement, fulfillment, refund, cancellation).
### Using the production environment
In the production environment, you'll need to use the base production URL and your live publishable key.
Please [let us know](/help/contact) when you are ready to go live so we can coordinate final testing. Once that's done, you'll be able to view your live publishable key in the merchant console.
# Responses
### HTTP status codes
Hakuna uses conventional HTTP status codes to indicate the success or failure of an API request. Codes in the `2XX` range indicate a successful request, and codes in the `4XX` range indicate a failed request, typically due to invalid inputs or operations.
Here's a summary of the HTTP status codes you could receive from the Hakuna API:
| STATUS CODE | DESCRIPTION |
| ----------- | ---------------- |
| 200 | Success |
| 400 | Bad Request |
| 401 | Unauthorized |
| 404 | Entity Not Found |
### Error responses
When an unsuccessful request occurs, you will receive a payload in the following format:
```json
{
"error": {
"error_code": "supported_error_code",
"validation_errors": []
}
}
```
All error payloads will contain a unique `error_code` which you can use to identify the error. In case of a badly formed request, Hakuna will also return additional `validation_errors`.
# Testing
Before you begin testing your integration in the sandbox environment, please add one or more test items representing product protection to your ERP system and provide your Hakuna Account Manager with the item IDs and corresponding product categories. We will set up the environment so that you can test all order events (placement, fulfillment, refund, cancellation).
# API reference
You can access the Hakuna API reference here:
{% embed url="" %}
# Contact
We welcome your questions, feedback and suggestions.
### We're happy to help!
Feel free to send us an email: